How do you know a rubber gasket, hose, or bushing will perform before you approve it? You cannot judge reliability by appearance alone. Rubber parts fail in hidden ways: hardening, cracking, compression set, or separation from metal inserts. These defects often stay invisible until the part reaches the road.
One undetected flaw can trigger leaks, vibration, noise, or costly warranty claims. This guide turns complex automotive rubber parts testing into practical checkpoints you can apply during purchasing and inspection. You will learn which tests matter for each part's function, how to read supplier data, and how to build a simple incoming inspection plan. That knowledge protects your production line and your reputation.
Key Takeaways
- Test rubber parts with hardness and tensile strength checks to ensure they seal and flex properly.
- Check compression set and fluid resistance to predict long-term performance under heat and chemicals.
- Verify rubber-to-metal bonds with peel tests to prevent separation and noise.
- Build an incoming inspection plan with sampling and acceptance criteria to catch defects early.
- Qualify suppliers by confirming in-house durability testing and IATF 16949 certification.
What Automotive Rubber Parts Testing Covers
Rubber part checks combine mechanical, environmental, chemical, and dimensional tests. Each test reveals behavior under stress, heat, or fluid. You do not need to run every method in your lab. Know which checks matter for the part's function and how to read supplier reports.
The Role of Quality Inspection in Purchasing
Incoming quality inspection happens before mass production uses raw materials or components. This timing catches defects before they reach your assembly line. Suppliers can gradually substitute cheaper materials—quality fade. A clear verification plan checks lots against a component data form. Use acceptance sampling plans like AQL to accept or reject a lot.
Supplier acceptance may rely on the supplier's own quality system or third-party auditing. Third-party checks help when a supplier is new, materials are expensive, or laboratory analysis is required. Every verification step reduces the risk of hidden rubber defects.
Key Test Categories for Rubber Components
Mechanical tests form the core of automotive rubber parts testing. Hardness per ASTM D2240 shows sealing force. Tensile strength and elongation per ASTM D412 reveal material strength and flexibility. Compression set per ASTM D395 Method B measures recovery after long-term squeezing at elevated temperature.
Environmental and chemical tests simulate real service. Fluid resistance per ASTM D471 checks mass change after 72 hours in a specified fluid. Ozone and heat aging expose rubber to cracking or hardening. FTIR and TGA confirm polymer family and filler content.
Dimensional checks cover every part. Optical comparators check O-ring dimensions. A CMM handles complex 3D parts. Visual checks at 2.0 lux look for bubbles, contamination, or flash larger than 0.3mm. Weight stays within ±5% of target. The table below list method distribution and acceptance ranges.
Property
Test Method
Typical Acceptable Range
Cross-section diameter (O-ring)
Optical comparator / micrometer
±0.05 to ±0.10mm per drawing
Inside diameter (O-ring)
Optical comparator
±0.15 to ±0.30mm per drawing
Hardness (Shore A)
Durometer (ASTM D2240)
±5 Shore A of target
Visual appearance
Visual (2.0 lux illumination)
No bubbles, no contamination, no flash >0.3mm
Weight
Precision scale
±5% of target weight
Core Mechanical Tests: Hardness and Tensile Strength
Hardness and tensile strength form the foundation of automotive rubber parts testing. These two properties tell you how a part will seal, flex, and survive under load. ASTM D2240 covers hardness measurement, while ASTM D412 defines tensile strength and elongation procedures. Together, they reveal whether a compound meets its performance targets.
Reading Durometer Hardness Results
A durometer measures how far a spring-loaded indenter sinks into rubber. The Shore A scale runs from 0 to 100. Higher readings mean harder rubber. Soft rubber falls between 20-40 Shore A, medium rubber between 40-60, and hard rubber between 60-80. Typical automotive sealing parts include door seals at 55 Shore A, pneumatic O-rings at 65-75, and hydraulic O-rings at 70-90. Readings below 10 or above 90 become unreliable and require a different durometer scale.
Hardness directly affects sealing force. A 70 Shore A O-ring seats with lower compressive force and conforms readily to rough surfaces. A 90 Shore A O-ring needs greater force to seat but resists extrusion under high pressure. Above 3,000 psi (200 bar), a 70 Shore A seal risks extrusion, while 80-90 Shore A may still need a backup ring.
Temperature changes everything. A 70 Shore A compound may behave like 55-60 Shore A at maximum operating temperature. At -40°F, a 70 Shore A nitrile seal may act as hard as 95 Shore A or higher. For cold climates, check the brittle point or TR-10 temperature, not just the room-temperature rating.
Understanding Tensile Strength and Elongation
Tensile strength measures the force required to break a rubber specimen. Elongation records how far it stretches before failure. These values expose material quality and flexibility. A nitrile compound reaches at least 8 MPa at 50 Shore A and at least 14 MPa at 70 Shore A. HNBR stretches 200%-500% at break, while EPDM reaches 200%-600%.
Low tensile strength signals weak filler content or poor cure. Low elongation points to a stiff, brittle compound prone to cracking. You should compare supplier data against these ranges before approving a lot. A part with good hardness, tensile strength, fatigue resistance will handle vibration and thermal cycling without premature failure.
Compression set deserves attention here. Harder compounds do not automatically resist set better. A 70 Shore A peroxide-cured EPDM outperforms a 70 Shore A sulfur-cured EPDM of the same hardness. Temperature accelerates set, so evaluate this property at the actual operating temperature. Two rounds of testing—hardness and tensile—give you a clear picture of compound quality before the part reaches your line.
Environmental Tests for Long-Term Reliability
Initial strength means little if a part fails after six months under the hood. Environmental testing simulates the heat, fluids, and weather a component meets in service. These checks reveal whether a compound holds its properties over time.
Compression Set and Heat Aging
Compression set measures how much a rubber seal fails to recover after long-term squeezing. You compress a specimen, hold it at elevated temperature, release it, and measure the permanent deformation. ASTM D395 and ISO 815 define this procedure. A common acceptance criterion limits compression set to a maximum of 25%. ISO 815 testing can run at temperatures up to 150°C. A seal with high compression set loses contact force and leaks.
Heat aging exposes rubber to hot air and tracks property loss. ASTM D573 covers accelerated aging with a maximum 20% property loss after 168 hours at 100°C. ASTM D865 validates heat resistance with less than 15% property loss. These limits matter for valve cover gaskets, O-rings, and any rubber seals that sit near exhaust or engine heat.
Temperature extremes drive real-world failure. Overheating prematurely wears thrust seals and breaks down lubricating oil into deposits. Overcooling produces water-oil sludge and corrosion. Material choice decides the outcome. EPDM handles temperature swings and stays flexible. Silicone serves extreme heat and cold. NBR does not suit extreme temperatures.
Fluid Resistance and Ozone Exposure
Underhood components contact oil, fuel, and coolant every day. ASTM D471 and ISO 1817 measure fluid resistance. A typical limit caps volume swell at 18% in IRM 903 oil. Incompatible materials swell, crack, or leak when exposed to oils, fuels, or coolants. NBR resists oil and gasoline, so builders specify it for fuel systems. Viton also resists oils and chemicals. Coolant compatibility is a stated selection factor because an incompatible seal fails early.
A perforated rubber pump seal can draw air into the cooling system. Air mixed with coolant may speed rust formation up to 30 times. Rust in the coolant then acts as an abrasive that wears seals further.
Ozone attacks stretched rubber and causes surface cracks. ASTM D1149 and ISO 1431 run ozone chambers at 25-200 pphm, typically at 40°C, and document crack formation. Sumitomo Riko and Yokohama Rubber test hoses at 50-100 pphm and with UV-B at 0.68 W/m²/nm intensity. Their findings show ozone cracks unstabilized compounds fast, while UV degradation is slower and mainly affects surface properties and color. Stabilizer packages and antiozonants in EPDM extend underhood hose life by roughly 35-50%. ASTM G154 and ISO 4892 add UV weathering cycles. This testing matters for rubber seals around the hood and trunk lid, which face sunlight, rain, and ozone daily.
OEMs and Tier 1 suppliers require compounds to meet SAE J200 or ASTM D2000. Performance stays traceable to formulation, mixing records, and batch test data. That traceability links standardized results to the material in your production lot. Real durability depends on temperature, oil, coolant, and weather exposure, not just the number on a datasheet.
Bonding, Dimensional Checks, and Compound ID
Rubber-to-metal parts face constant stress from vibration and thermal cycling. A weak bond lets the rubber insert separate from the metal core. That separation causes noise, misalignment, and premature failure. You need adhesion tests and material verification to confirm the part will hold together.
Adhesion Tests for Rubber-to-Metal Parts
ASTM D429 defines the standard test methods for rubber adhesion to rigid substrates. It covers five lettered methods. Method A uses a rubber-between-metal sandwich under tension. Method B applies a 90-degree peel. The automotive industry treats Method B as the default for production quality control. Under IATF 16949, the recommended minimum peel strength for automotive engine mounts is at least 6 kN/m (34 lb/in). A part passes only when it reaches that value with a rubber-tear (R) failure mode. Adhesive failure (CM or RC) means rejection.
Attribute
Detail
Governing standard
ASTM D429
QC default method
Method B (90-degree peel)
Peel strength target
At least 6 kN/m (34 lb/in)
Pass criterion
Rubber-tear (R) failure at or above 6 kN/m
Fail criterion
Adhesive failure (CM or RC)
Run one destructive test per lot using an ASTM D429 Method B fixture. This practice catches weak rubber-to-metal bonding before parts reach your line. A proper rubber-to-metal bonding process controls surface preparation, primer application, and cure temperature. Each step affects final durability.
FTIR and TGA for Material Verification
FTIR spectroscopy identifies the polymer family and detects contamination. It reads characteristic absorption peaks to confirm filler identity during incoming material screening. TGA measures filler and volatile content in a single run. Polymer decomposition occurs between 300-500°C. Carbon black combustion in air or oxygen occurs between 500-700°C. Inorganic filler residue remains as mass above 700°C. This lets you quantify filler loading, ash, and volatile loss.
-
Polymer decomposition: 300-500°C.
-
Carbon black combustion: 500-700°C.
-
Inorganic filler residue: above 700°C.
Rheometric and Mooney viscosity control round out compound consistency checks. Together, these testing methods verify that each lot matches the approved formula. That consistency protects long-term durability across every production run.
Building an Incoming Inspection Plan
A solid inspection plan protects your production line from defective rubber parts. You need clear rules for sample size, testing frequency, and acceptance criteria. These rules should match the part's risk level and your supplier's track record.
Sample Size, Frequency, and Acceptance Criteria
Start with your lot size and the acceptable quality limit you can tolerate. For automotive rubber parts, an AQL of 1.0 is common. Follow these steps to build your sampling plan:
-
Determine the lot size and specified AQL level.
-
Refer to MIL-STD-105D Table I: locate the lot size range and move across to General Inspection Level II to find the sample size code letter.
-
Refer to Table II-A: find the code letter to determine the required sample size, which you must pull at random from the lot.
-
Apply the AQL column value to find accept and reject numbers: if defectives stay at or below the accept number, accept the lot; if they reach the reject number, reject it.
-
Use switching rules based on quality history: tightened inspection protects you when quality history is unsatisfactory, while reduced inspection works when less discrimination is needed.
For a lot of 3,201–10,000 pieces, code letter L requires 200 random pieces. With AQL 2.5% major and 4.0% minor, you accept if you find no more than 10 major and 14 minor defects. First Article Inspection covers a full battery of physical property tests on the first lot. Ongoing production lot testing uses a reduced set—durometer, tensile, and compression set at minimum—at a defined frequency.
Your documentation package should include a Certificate of Conformance, material certificate, physical property test report with actual lot data, dimensional inspection report, and process records. For automotive applications, IATF 16949 extends ISO 9001 with automotive-specific requirements including APQP, PPAP, FMEA, and MSA.
Practical Checks for Hoses and Bushings
You can catch many defects with simple field checks before laboratory testing begins. Squeeze rubber hoses to confirm the rubber feels firm but supple. Look for abrasions, bulges, or cuts—any of these means rejection. Check fluid and air holding parts for leaks. Inspect shock absorber rubber bushings for dry-rot. For drag-link rubber bushings, verify they are not split or cut and confirm proper greasing.
Tactile checks reveal hidden problems. Feel whether the rubber is stiff and does not flex easily—this signals hardening and loss of elasticity. Squeeze for soft or spongy areas that indicate internal delamination. Visual signs matter too: surface cracks near bends or clamps mean deteriorated rubber, alligator-skin patterns indicate ozone damage, and oily residue or swelling points to chemical attack. A collapsed lower radiator hose may lack its inner reinforcing coil. Build these checks into your buyer's checklist for every incoming shipment.
Automotive Rubber Bushing Supplier Qualification
A qualified rubber bushing supplier must prove capability before you award a contract. Your automotive rubber bushing supplier qualification should verify in-house durability testing, not just outsourced reports. A supplier that runs its own servo-hydraulic fatigue rig with multi-axis loading can test a bushing through 500,000 cycles for passenger cars and 1,000,000 cycles for commercial applications. That in-house capability shortens feedback loops and strengthens your qualification process.
Quality, Capacity, and NVH Performance
Your supplier qualification must confirm a valid IATF 16949 certification covering the product category and manufacturing site. IATF 16949 certification signals PPAP capability, including PFMEA, control plan, MSA, SPC, and a Cpk of at least 1.33 for critical characteristics. ISO 9001 alone does not satisfy safety-critical OEM requirements. For quality, capacity, and NVH performance, check molding press capacity at 120% of forecast and documented tooling maintenance.
Stiffness and dynamic performance decide ride comfort. You need both static and dynamic stiffness testing. Static stiffness runs at 0.01–0.1 Hz, while dynamic stiffness typically runs at 100 Hz. The dynamic stiffness ratio (DSR) tells you how much noise the bushing transmits. A lower DSR of 1.2–1.6 isolates noise well. A higher DSR of 1.8–2.5 may pass road noise into the cabin. Correct static stiffness alone cannot guarantee NVH performance.
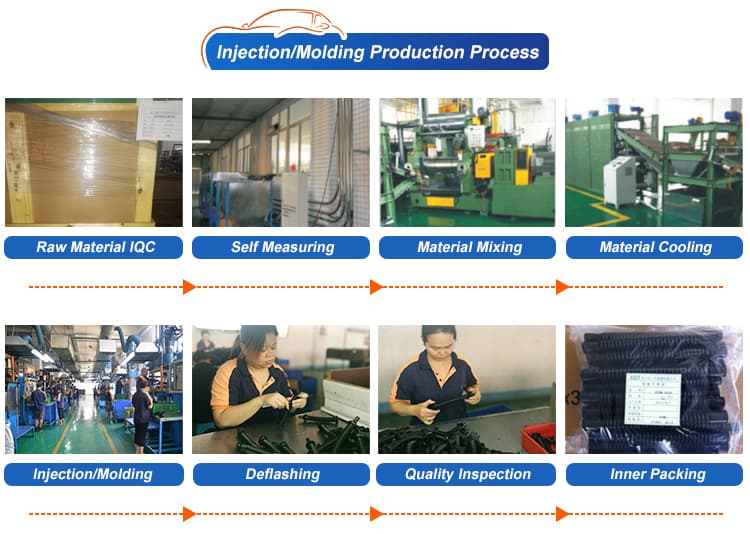
Rubber Bushing Supplier Audit Checklist
Use this checklist during every supplier qualification audit:
| Audit area | Checklist items |
| Rubber-to-metal bonding | Destructive peel tests (minimum 3 per batch); visual and ultrasonic inspection; defined reaction plan |
| Stiffness and NVH | Static and dynamic stiffness testing; dynamic stiffness ratio calculation |
| Durability validation | 500,000 cycles for suspension bushing; 1,000,000+ for heavy-duty; no bond separation; stiffness degradation ≤20% |
| Corrosion protection | 480 hours salt spray for standard parts; 720–1000 hours for premium platforms |
| Production capacity | Nameplate capacity adjusted for OEE (70–85%); capacity commitment letter |
Durability validation must include multi-axis loading and realistic environmental conditions. Your rubber bushing supplier should also provide salt spray reports from actual production samples. For quality system and certification checks, request raw material records, dynamic load testing data, torsion testing results, hardness testing, and ozone and heat aging evaluation. A supplier with strong durability testing and traceability protects your program from late-stage failures.
Avoid Common Quality Inspection Mistakes
Price and Visual Checks Are Not Enough
A low price and a clean surface can fool you. Rubber compounds, bonding strength, and fatigue behavior cannot be judged by eye. You need documented testing to confirm what a visual check cannot show.
Document your sample approval as a mini contract. Specify approved characteristics, production conditions, and the consequence if bulk parts do not match. Include a clause that forces the supplier to notify you if any production variable changes. Treat that approved sample as feasibility proof only. Require evidence that the supplier can repeat the quality across shifts and batches.
Dimensions matching does not confirm compound or bonding quality. A good sample does not prove batch consistency. A low price often hides cuts in material grade.
A stabilizer link sample can pass visual checks and fitment checks. That does not prove repeatability for 100,000 pieces. Ask for lot certificates and process capability data before you approve bulk supply.
Lot Variation and Shelf Life Risks
Production parts drift from approved samples. Machine settings shift, material batches vary, and tooling wears. Your incoming inspection must catch that drift. Use lot certificates to compare each shipment to the baseline.
Rubber degradation starts at the moment of manufacture. EPDM rubber typically has a shelf life of 5 to 10 years when stored correctly. ARP 5316 governs elastomeric seal storage, including temperature and packaging.
Oxidative degradation causes chain scission and additional crosslinking, while plasticizer migration alters flexibility. Any of these changes affects hardness and compression set. A static seal with compression set exceeding 50% loses sealing force and fails. A bushing with hardened rubber transmits more road noise. That same bushing may lose its bond to the metal core. Worn bushings degrade ride durability quickly. Compound durability depends on storage history, so inspect rubber bushings for surface cracks.
Write the production date on your inspection records. If a lot sat in storage for years, test hardness before release. Simple testing on arrival protects your line from early failures. Replacing a failed bushing costs more than catching it early.
Rubber part checks are not reserved for laboratory engineers. They are a practical risk management tool for every purchaser. A strong qualification protects your production line.
Start with a buyer's checklist. Include automotive rubber parts testing data, supplier qualification records, and incoming inspection results. Then request test data on your next purchase. Review supplier certifications. Perform basic visual and tactile checks on each bushing. Squeeze the hose. Look for cracks. Feel for hardening.
A qualified supplier with strong testing shares data readily. Confirm your bushing supplier runs in-house durability tests. Track bushing hardness and compression set.
FAQ
Which test matters most for a sealing part?
Compression set per ASTM D395 tells you the most. A seal with high compression set loses contact force and leaks. Limit permanent deformation to a maximum of 25%. Pair this test with hardness readings to confirm the compound will seal under real operating conditions.
How do you verify a rubber bushing supplier?
Check for IATF 16949 certification covering the manufacturing site. Confirm the supplier runs an in-house durability rig through 500,000 cycles for passenger cars. Request peel strength data per ASTM D429 Method B. Look for a dynamic stiffness ratio between 1.2 and 1.6 for good noise isolation.
Can you judge rubber quality by appearance alone?
No. Visual checks catch surface defects like cracks or flash. They cannot reveal compound strength, bonding quality, or compression set. A clean sample may still fail after thermal cycling. Always pair visual inspection with documented test data from the supplier.
How does shelf life affect incoming rubber parts?
Rubber degrades from the moment of manufacture. EPDM typically lasts 5 to 10 years when stored correctly. Oxidative degradation changes hardness and compression set. Check the production date on every lot. Test hardness before release if a shipment sat in storage for years.
What should an incoming inspection plan include?
Start with AQL sampling based on lot size and part criticality. For a lot of 3,201–10,000 pieces, pull 200 random samples. Accept no more than 10 major defects at AQL 2.5%. Require a Certificate of Conformance, material certificate, and physical property test report with actual lot data.